Why Nginx Is a Force Multiplier
Nginx is much more than a web server. In a production setup, it becomes a control point for:
- traffic routing,
- security enforcement,
- application resilience,
- performance optimization,
- and operational visibility.
In your environment, Nginx is used as a reverse proxy for public websites and protected with ModSecurity, which is exactly the right direction for an internet-facing stack.
Real-World Reverse Proxy Pattern
A practical pattern for your domains:
- Site1.mouradcloud.com
- site2.mouradcloud.com
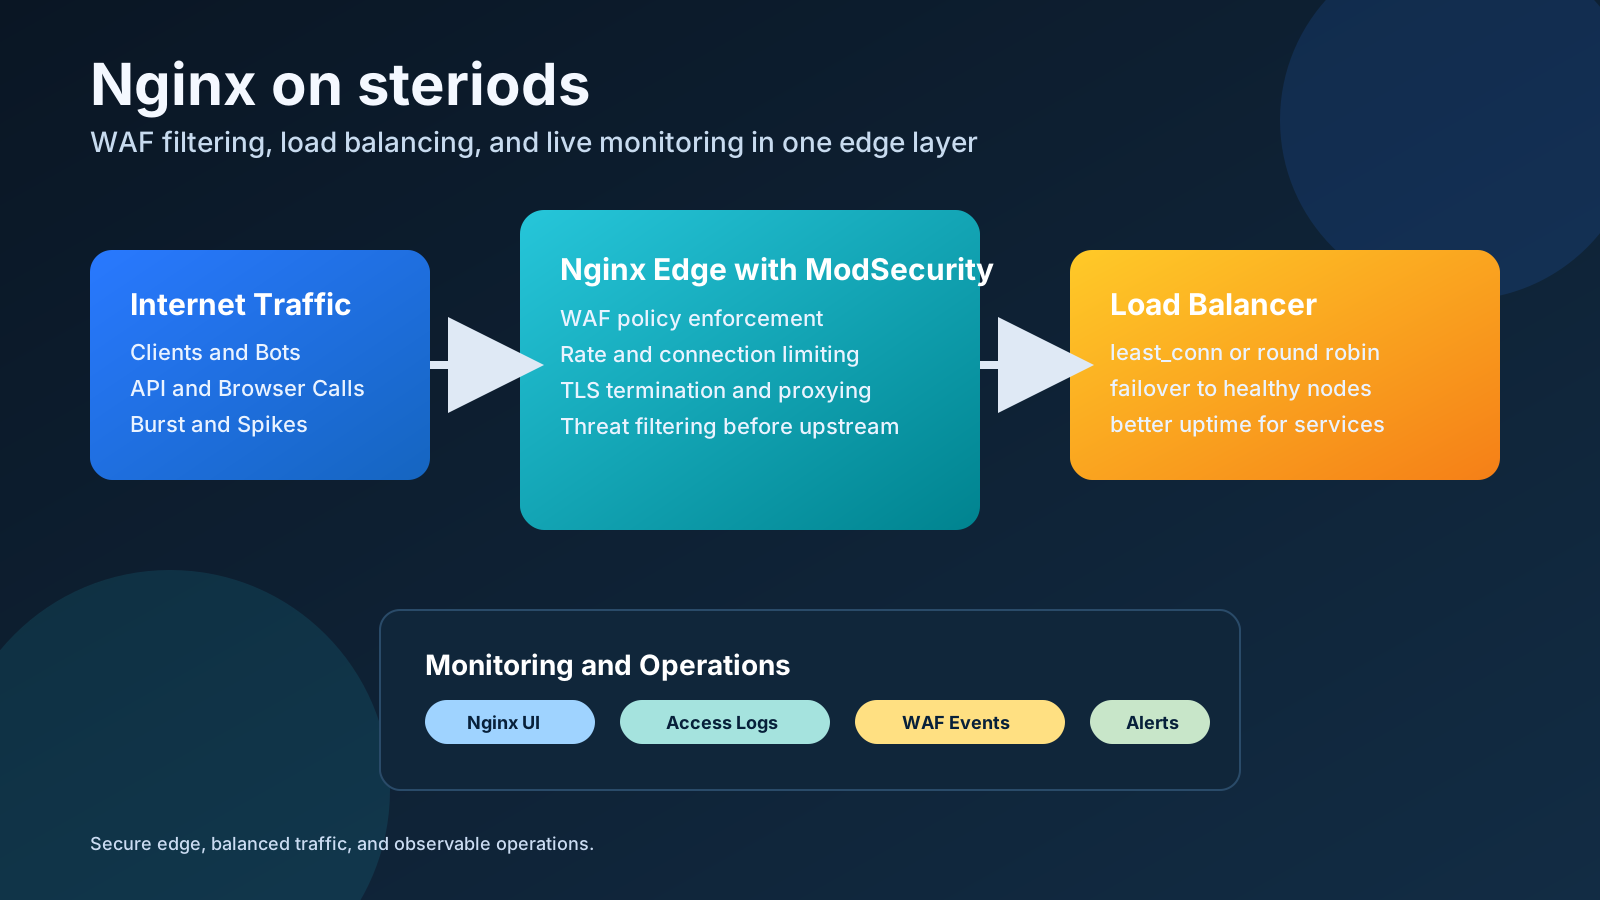
Public clients hit Nginx first, then Nginx forwards traffic to internal upstream targets. This lets you enforce policy once at the edge instead of configuring security separately in every backend service.
Internet Clients
      |
      v
Nginx Edge (TLS + WAF + Rate Control + Logging)
      |
      +--> blog upstream (internal app)
      |
      +--> home upstream (internal app)
Install Nginx and Enable SSL with Certbot
Use this baseline flow on Ubuntu/Debian:
# Install Nginx
sudo apt update
sudo apt install -y nginx

# Allow web traffic through firewall
sudo ufw allow 'Nginx Full'

# Install Certbot and Nginx plugin
sudo apt install -y certbot python3-certbot-nginx

# Request and configure certificates for both sites
sudo certbot --nginx -d Site1.mouradcloud.com -d site2.mouradcloud.com
After issuance, Certbot updates Nginx server blocks and can add HTTP to HTTPS redirects automatically.
Useful SSL operations:
# Test auto-renewal
sudo certbot renew --dry-run

# Validate and reload Nginx safely
sudo nginx -t
sudo systemctl reload nginx
Install and Configure ModSecurity
Install ModSecurity packages and OWASP Core Rule Set:
sudo apt update
sudo apt install -y libnginx-mod-http-modsecurity modsecurity-crs
Enable and tune ModSecurity:
# Enable engine
sudo cp /etc/modsecurity/modsecurity.conf-recommended /etc/modsecurity/modsecurity.conf
sudo sed -i 's/SecRuleEngine DetectionOnly/SecRuleEngine On/' /etc/modsecurity/modsecurity.conf

# Optional: include unicode mapping if not already present
sudo test -f /etc/modsecurity/unicode.mapping && echo "unicode mapping present"
Create a focused Nginx ModSecurity include file:
# /etc/nginx/modsec/modsecurity.conf
modsecurity on;
modsecurity_rules_file /etc/modsecurity/modsecurity.conf;
modsecurity_rules_file /usr/share/modsecurity-crs/owasp-crs.load;
Attach it to your HTTPS server blocks:
server {
    listen 443 ssl http2;
    server_name Site1.mouradcloud.com;

    include /etc/nginx/modsec/modsecurity.conf;

    location / {
        proxy_pass http://site1_backend;
    }
}
Then validate and reload:
sudo nginx -t
sudo systemctl reload nginx
Operational tip: start in DetectionOnly for a short baseline period, inspect false positives, then switch to On for active blocking.
Baseline Security Controls You Should Enable
1) ModSecurity WAF at the Edge
Keep ModSecurity enabled per virtual host:
modsecurity on;
modsecurity_rules_file /etc/nginx/modsec/modsecurity.conf;
Benefit: blocks known malicious payload patterns before they reach backend apps.
2) Force HTTPS
Always redirect port 80 to HTTPS:
server {
    listen 80;
    server_name Site1.mouradcloud.com site2.mouradcloud.com;
    return 301 https://$host$request_uri;
}
Benefit: protects credentials and session traffic in transit.
3) Forwarded Headers
Preserve source and protocol context:
proxy_set_header Host $host;
proxy_set_header X-Real-IP $remote_addr;
proxy_set_header X-Forwarded-For $proxy_add_x_forwarded_for;
proxy_set_header X-Forwarded-Proto $scheme;
Benefit: accurate client identity for logs, app logic, and incident response.
Reverse Proxy + Caching Configuration Example
Use a tuned reverse proxy server block per site:
server {
    server_name Site1.mouradcloud.com;

    location / {
        proxy_pass http://blog_backend;

        proxy_set_header Host $host;
        proxy_set_header X-Real-IP $remote_addr;
        proxy_set_header X-Forwarded-For $proxy_add_x_forwarded_for;
        proxy_set_header X-Forwarded-Proto $scheme;

        proxy_connect_timeout 30s;
        proxy_send_timeout 60s;
        proxy_read_timeout 60s;

        proxy_cache site_cache;
        proxy_cache_valid 200 301 302 1h;
        proxy_cache_valid any 5m;
        proxy_cache_use_stale error timeout updating http_500 http_502 http_503 http_504;

        add_header X-Proxy-Cache $upstream_cache_status always;
    }

    modsecurity on;
    modsecurity_rules_file /etc/nginx/modsec/modsecurity.conf;

    listen 443 ssl http2;
    ssl_certificate /etc/letsencrypt/live/Site1.mouradcloud.com/fullchain.pem;
    ssl_certificate_key /etc/letsencrypt/live/Site1.mouradcloud.com/privkey.pem;
}
Benefit: faster repeat responses, reduced backend pressure, and better behavior during transient upstream failures.
Load Balancing for Better Availability
When you have multiple backend instances, move to upstream pools:
upstream blog_backend {
    least_conn;
    server 192.168.251.20:80 max_fails=3 fail_timeout=15s;
    server 192.168.251.21:80 max_fails=3 fail_timeout=15s;
    keepalive 64;
}

upstream home_backend {
    ip_hash;
    server 192.168.251.30:80;
    server 192.168.251.31:80;
}
Routing strategy notes:
- least_conn: good for uneven request durations.
- ip_hash: useful when session stickiness is required.
- round robin: default and often enough for stateless services.
Security Hardening Add-ons
Add these controls to reduce attack surface even more:
# Basic burst control
limit_req_zone $binary_remote_addr zone=req_limit_per_ip:10m rate=20r/s;

# Connection control
limit_conn_zone $binary_remote_addr zone=conn_limit_per_ip:10m;

# Security headers (example baseline)
add_header X-Frame-Options "SAMEORIGIN" always;
add_header X-Content-Type-Options "nosniff" always;
add_header Referrer-Policy "strict-origin-when-cross-origin" always;
You can also enforce geographic policy (for example allowing specific countries) if that matches your business traffic profile.
Monitoring and Operations with Nginx UI
Nginx UI is a great operational layer for day-2 operations:
- visual status of Nginx and sites,
- safer configuration edits,
- quick reloads and syntax validation,
- easier log navigation and troubleshooting,
- improved team operations when multiple admins are involved.
Recommended practice:
- keep CLI as source of truth for automation,
- use Nginx UI for visibility and controlled operational changes,
- still validate with nginx -t before reload in production pipelines.
Install and Configure Nginx UI
Nginx UI provides a visual dashboard for easier operations and safer configuration management:
# Download and install Nginx UI (example for Linux x86_64)
cd /opt
sudo wget https://github.com/uengine-oss/nginx-ui/releases/download/v2.0.0-beta.6/nginx-ui-linux-amd64.tar.gz
sudo tar xzf nginx-ui-linux-amd64.tar.gz
sudo chown -R www-data:www-data /opt/nginx-ui
Create a SystemD service for Nginx UI:
# /etc/systemd/system/nginx-ui.service
[Unit]
Description=Nginx UI
After=network.target

[Service]
Type=simple
User=www-data
Group=www-data
WorkingDirectory=/opt/nginx-ui
ExecStart=/opt/nginx-ui/nginx-ui
Restart=on-failure
RestartSec=10

[Install]
WantedBy=multi-user.target
Enable and start:
sudo systemctl daemon-reload
sudo systemctl enable nginx-ui
sudo systemctl start nginx-ui
Nginx UI typically listens on port 7788 by default. Access it via http://localhost:7788 (or your server IP).
Key features:
- Visual config editing with syntax validation
- Reload Nginx safely after changes
- Log viewer for quick troubleshooting
- Certificate management interface
- Upstream and load balancer visualization
Best practice: use Nginx UI for visibility and controlled changes, keep CLI as source of truth for automation and backups.
Useful Validation and Troubleshooting Commands
# Validate config before applying
sudo nginx -t

# Reload safely after successful validation
sudo systemctl reload nginx

# Watch Nginx errors in real time
sudo tail -f /var/log/nginx/error.log

# Check WAF-related events (if routed to error log)
sudo grep -iE "modsecurity|denied|access forbidden" /var/log/nginx/error.log
Automated IP Decisions at the Edge
One of the biggest improvements I made in this setup was moving suspicious-IP handling to Nginx at Layer 7 instead of relying only on Layer 4 blocking.
Why that matters:
- Layer 7 sees the actual request path, headers, and patterns, so it can spot probing for
.env,wp-config.php,config.php,.git, traversal attempts, and framework scans. - Layer 4 blocking is coarser and can be too aggressive when you only want to stop malicious HTTP behavior without cutting off normal traffic from the same source.
- With Nginx in the middle, you can make decisions based on request behavior, log the evidence, and block only the IPs that truly look abusive.
A practical workflow is:
- Parse Nginx access and error logs on a schedule.
- Detect repeated probing, scanning, traversal, or exfiltration attempts.
- Append only new unique malicious IPs to a shared deny file such as
/etc/nginx/snippets/ip-blocklist.conf. - Reload Nginx so the deny rules take effect immediately.
Example automation pattern:
#!/usr/bin/env bash
set -euo pipefail

ACCESS_LOG=/var/log/nginx/access.log
ERROR_LOG=/var/log/nginx/error.log
BLOCKLIST=/etc/nginx/snippets/ip-blocklist.conf
STATE=/tmp/nginx-threat-monitor.pos

# Read new log entries, score suspicious behavior, and emit one decision per IP.
# If the IP is new and clearly malicious, append: deny x.x.x.x;
# Then run: nginx -t && systemctl reload nginx
This approach gives you faster reaction time at the edge, better visibility into the attack pattern, and less risk of blocking legitimate users than a broad Layer 4 rule set.
Final Takeaway
Nginx becomes "on steriods" when you combine these layers together:
- reverse proxy for centralized traffic control,
- ModSecurity for attack filtering,
- load balancing for resilience,
- caching for performance,
- and Nginx UI for better monitoring and operations.
That combination gives you stronger security, cleaner operations, and better uptime for both Site1.mouradcloud.com and site2.mouradcloud.com.